Submit a Fluent job on ADA#
There are majorly 3 ways with which Ansys Fluent can be used on ADA.
Using a VNC desktop sesison via Open OnDemand.
Using an interactive session.
Using a batch mode submission.
Note that the former two will allow for a GUI based interaction, while the last option is a no-GUI option (a.k.a batch mode) job.
When there is only a few models, required to be run on ADA, with not much changing in between those models, a GUI based option can be explored with ADA.
However, if there are several configurations of the model that is to be simulated, (perhaps of the same model or otherwise), a batch mode submission (without GUI) should be used.
Note that this documentation doesn’t factor in the workbench based workflows that import Fluent job from various other standalones present in Ansys Workbench. This is simply becuase Workbench based Ansys usage is currently not supported for ADA yet. Do write to us if you would need help setting up the same for a more bespoke solution.
A simple workaround suggested for general usage for the same is that the CAD or Mesh of the model or assembly should be exported separately as a file (Fluent readable format). This will allow Ansys Fluent to import / read this file separately and can be easily done via both, batch mode for no-GUI job submissions, as well as GUI based jobs.
GUI based jobs#
VNC session and Visualization node will be the two preferred method to use a GUI for Ansys Fluent.
Using a VNC desktop session via Open OnDemand#
This will be a GUI based usage. Which means instead of your local system/laptop, you will be using Fluent on ADA to perform simulations.
Head to the Open OnDemand website.
Once the page opens, go to Interactive sessions -> VNC desktop sessions

One can now book the appropriate resource for the Ansys Fluent based on following
Set the number of hours for which you want to book the resource. (Note that once this time is over, the VNC session as well as everything that was being used here will be closed. Save your work accordingly or book the time accordingly.)
Set the number of cores for your job. (Note that this is on defq or hmemq partitions, which mean each node has a maximum of 96 cores. However, more number of cores can be booked, 96 is the number of CPUs for 1 node. And going to two nodes will increase the time for computation as now Fluent has to manage/copy files between two or more nodes. See more on scaling here Calculate number of cores required for Fluent job.
Set the amount of memory required for your job. (The thumb rule for setting the memory atleast for the defq is 4 times the number of cores. For hmemq this can be higher.)
Set the partition (either defq or hmemq).
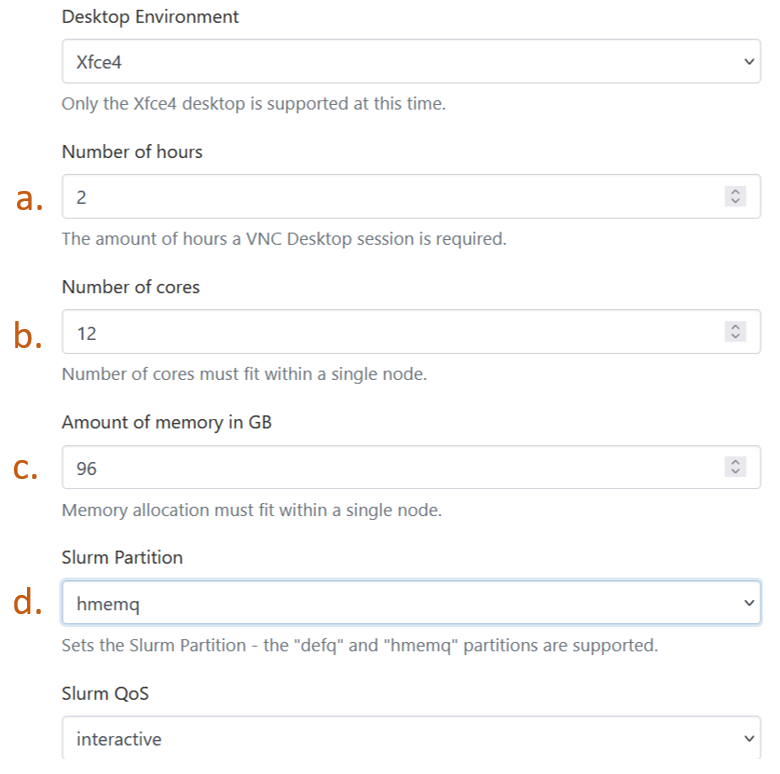
Launch the VNC desktop session by clicking “Launch”.
Once the resource becomes available, click “Launch VNC session”, and you will be taken to a linux based desktop like session, along with an email that your session has started.
Right click anywhere on the desktop screen and click “Open terminal here”. This will open up a shell with your login node visible.
Change to the directory which contains the Ansys Fluent files.
Load the fluent module with ,
module load ansys-uoneasy/2022R2
Start Fluent from the terminal.
fluent
The following screen will start indicating that Fluent can now be used as a regular software. Note that in this screen, the number of processors need to be equal to the number of cores booked in the VNC session booking from step 3.b. above.
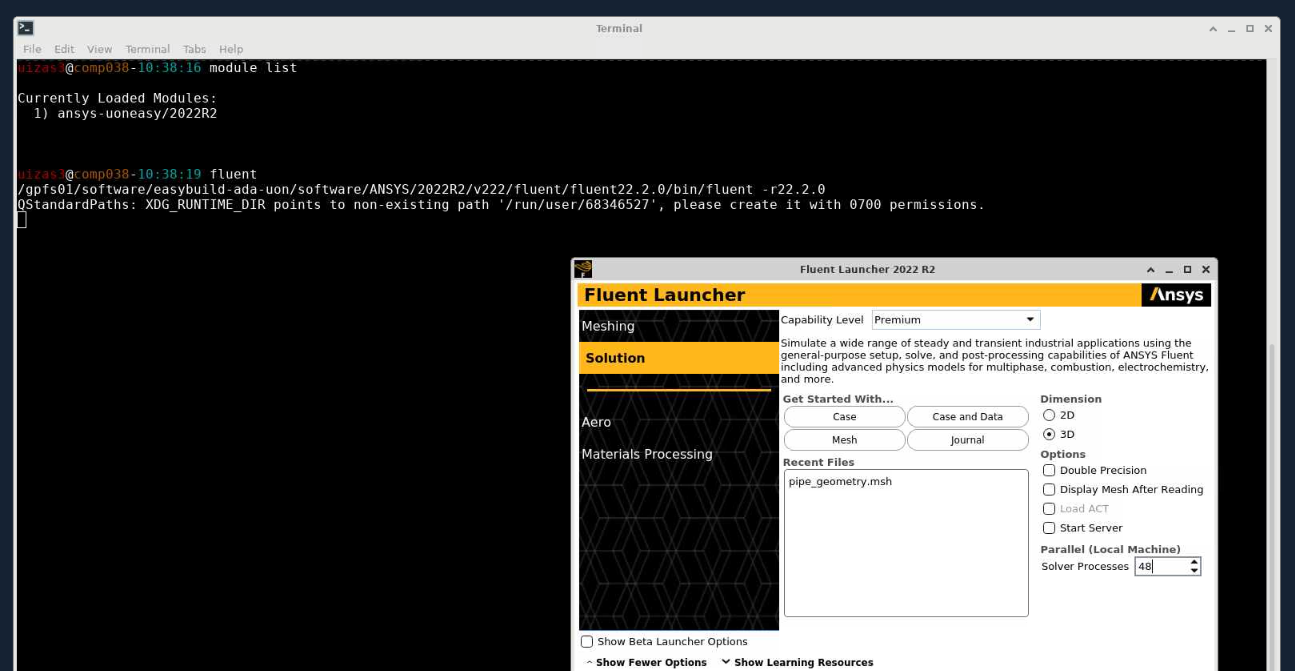
Enjoy using Ansys Fluent on ADA.
Using an interactive session#
This session implies that you have booked the requested resource exclusively for yourself and can use the resource as a desktop equivalent of ADA.
To do this,
Go to the directory in your home directory on ADA which contains the Fluent files.
Load the Ansys module,
module load ansys-uoneasy/2022R2
Book an interactive session. Using the following command accordingly,
srun --partition=defq --nodes=1 --ntasks-per-node=48 --mem=192g --time=2:00:00 --pty /bin/bash

# change partition flag to the appropriate partition accordingly.
# Thumb rule for nodes is kept as 1, as going to 2 nodes includes a communication overhead, slowing down computations.
# Thumb rule for mem flag is 4 times the number of cores on that partition for 1 node. Say for example, for defq partition 1 node has 48 cores, so 48 x 4 = 192G. Same applies for other partitions as well, however are slightly different for hmemq partition and the GPU partitions.
# Recommended time is also for 2 hours, however, remember that after this scheduled time, the allocated resource will be closed, which means, any notebook running during that time will also close and will be difficult to recover. Set the time accordingly.
# Using a GPU partition for Ansys fluent is discouraged, as there is little documentation for the same, including license limitations.
This means that 1 full node with 192G memory (48 cores with 4GB each) is requested for 2 hours time on the defq partition. Once the resource becomes available and you are inside the interactive session, the shell will change to the name of the corresponding compute node, i.e.
$ userid@ hpclogin02 (Ada)

## will change to the booked resources, say copmp004 becomes available.

$ userid @ comp004 (Ada)
Type in the fluent command to open the Fluent session.
fluent
Note that as these partitions do not have hardware acceleration, there is a possibility that the session may observe some lag in between mouse clicks. To use hardware acceleration for Ansys Fluent, one could also explose remote visualization which has been created for post processing purposes, but can also be used for a GUI based job for Fluent. The steps to run job on remote visualization can be seen from here Via Visualization Nodes.
Non-GUI based jobs#
As mentioend before, non-GUI based jobs mean that Fluent session is used and operated only via previously tested commands that set the case and run the simulation.
For this kind of Ansys Fluent usage, one would require three things.
A journal file.
A Fluent file (this could be a CAD file or a Fluent msh file).
A Slurm script that calls the fluent executable and sets the hardware resource for an HPC run.
Lets take a look at each of them one by one.
Journaling#
We look at an example of the following case, where a simple case has been demonstrated using the journaling features within Fluent. This case is of a mixing elbow case.
The boundary conditions for this mixing elbow case have been demonstrated in the image below.
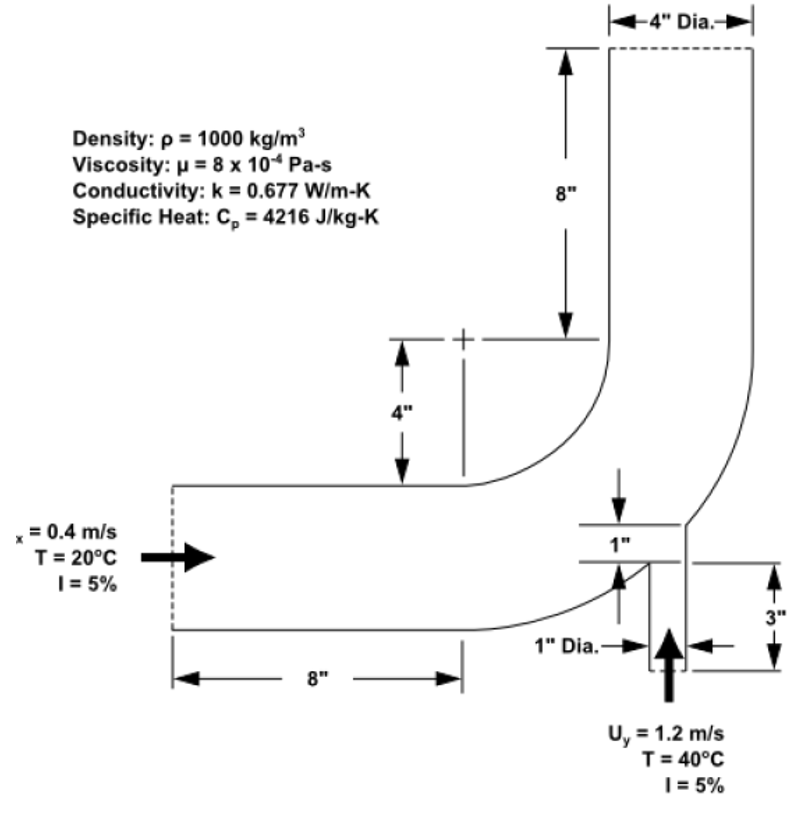
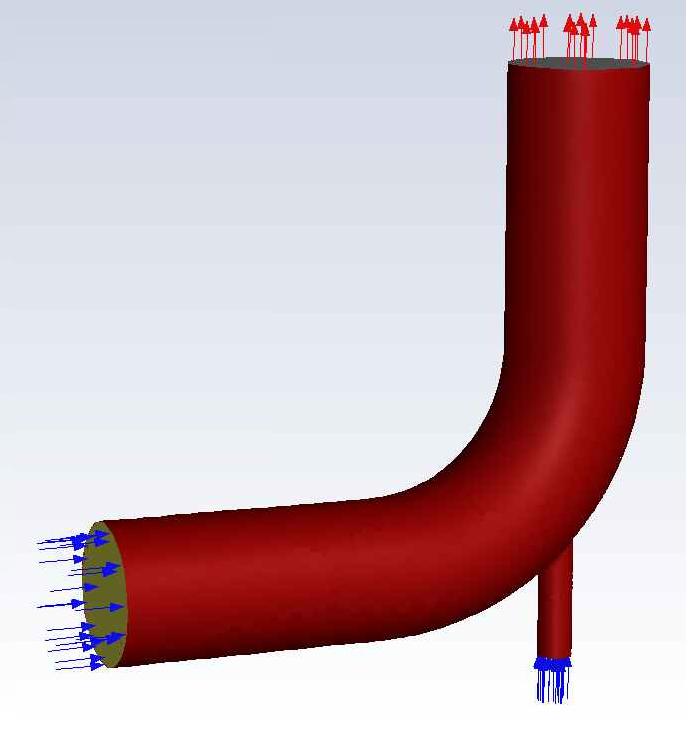
The problem to be considered is shown schematically. Cold fluid at 20° C flows into the pipe through a large inlet, and mixes with a warmer fluid at 40° C that enters through a smaller inlet located at the elbow. The pipe dimensions are in inches and the fluid properties and boundary conditions are given in SI units. The Reynolds number for the flow at the larger inlet is 50,800, so a turbulent flow model will be required. A 3D demonstration of this boundary condition and the case is shown from the image below.
This example will create settiings and submit this mixing elbow case and run the simulation on ADA.
A journal file as indicated below, essentially contains steps that one wants to be performed while setting up a Fluent case. This journal file should ideally contain all the global variable definitions, meshing conditions, surface-names etc. The level of detail for each of the tasks that should be scripted in journal depends on user’s tasks. These commands are usually created in Fluent’s console. See How to construct a journal file for Fluent batch jobs for how to use Fluent console to create a journal file for your Fluent jobs.
Attention
It is highly recommended to test the journal file in the Fluent console available in the GUI on a local machine before trying any tests on an HPC system. This step will help you solve any errors related to the journal file and can be corrected in GUI. Once the journal is without any errors, the same can be run on HPC
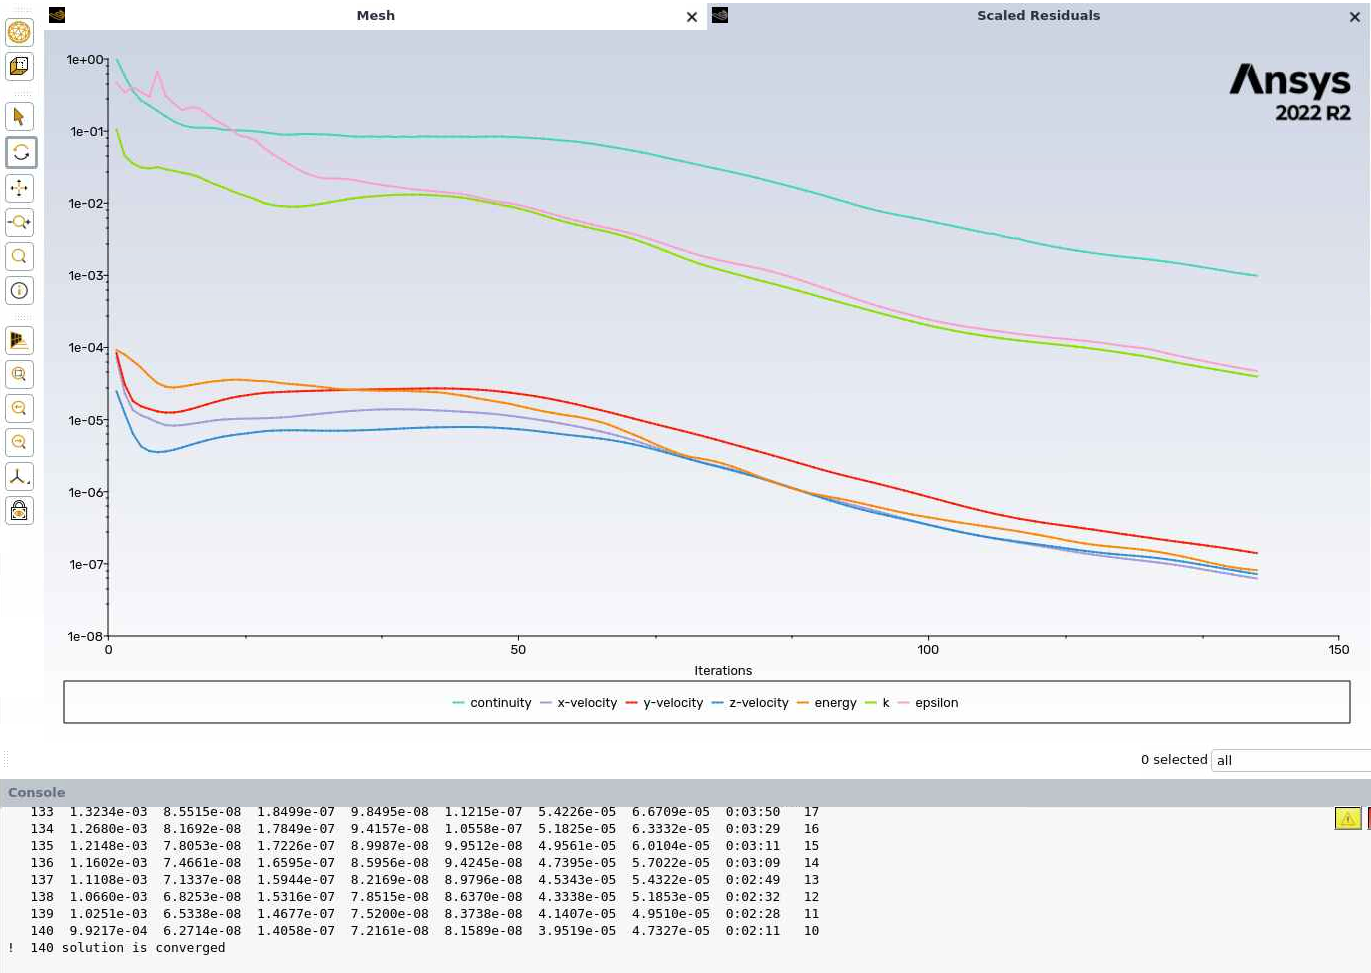
Corresponding Fluent’s console’s output has been indicated in the tab, indicating a successful opening of Fluent, setting up node_list that would run Fluent job, running for a specified number of iterations (150 in this case) and the model converging, finally reporting the system stats for the job.
/file/read/mixing-elbow-mesh.msh.gz
/mesh/check
q
;; define/models/Enable energy model? / Compute viscous energy dissipation? / Include pressure work in energy equation? / Include kinetic energy in energy equation? / Include diffusion at inlets?

/define/models/energy yes no no no no
q
q

/define/models/viscous/ke-standard yes
q
q

/define/models/viscous/near-wall-treatment/enhanced-wall-treatment yes
q
q

/define/materials/copy-by-formula fluid h2o<l>

/define/materials/change-create water-liquid water-liquid yes constant 1000 yes constant 4216 yes constant 0.677 yes constant 8e-4 no no no

/define/materials/list-materials
q

; assign water (created material) to the cell zone.
/define/boundary-conditions/fluid fluid yes water no no no no 0 no 0 no 0 no 0 no 0 no 1 no yes no no no

; set boundary conditions.
define/boundary-conditions/velocity-inlet inlet-large no no yes yes no 0.4 no 0 no 293.15 no no no yes 5 4

define/boundary-conditions/velocity-inlet inlet-small no no yes yes no 1.2 no 0 no 313.15 no no no yes 5 1


define/boundary-conditions/pressure-outlet outlet yes no 0 no 300 no yes no no no yes 5 3 yes no no no

define/boundary-conditions/wall wall 0 no 0 no no no 0 no no no no 1

;24=coupled, 20=simple, 21=simplec, 22=piso
/solve/set/p-v-coupling 20

/solve/set/warped-face-gradient-correction/enable no


; create surface definition.
/solve/report-definitions/add outlet-temp-avg surface-massavg surface-names outlet () average-over 1 field temperature report-type surface-massavg
q

/solve/convergence-conditions/conv-reports/add outlet-temp stop-cri 1e-5 initial-values-to-ignore 20 active no print yes report-defs "outlet-temp-avg"
q
q

/solve/convergence-conditions/conv-reports/add outlet-temp stop-cri 1e-5 initial-values-to-ignore 20 active yes print yes report-defs "outlet-temp-avg" q q q q

/solve/convergence-conditions/conv-reports/edit outlet-temp active yes
q
q


/solve/initialize/hyb-initialization
/iterate 150

/file/write-case-data ,
/display/save-picture residuals%i.jpg

/report/system/time-stats
/report/system/proc-stats
#######################################################################
No of tasks: 48
#######################################################################
hmcomp001
fluent commands start from here!!!
/gpfs01/software/easybuild-ada-uon/software/ANSYS/2022R2/v222/fluent/fluent22.2.0/bin/fluent -r22.2.0 3ddp -ssh -t48 -mpi=intel -pinfiniband -cnf=hmcomp001 -gu -i setcase.jou
/gpfs01/software/easybuild-ada-uon/software/ANSYS/2022R2/v222/fluent/fluent22.2.0/cortex/lnamd64/cortex.22.2.0 -f fluent -gu -i setcase.jou (fluent "3ddp -host -r22.2.0 -t48 -cnf=hmcomp001 -path/gpfs01/software/easybuild-ada-uon/software/ANSYS/2022R2/v222/fluent -ssh")
Opening input/output transcript to file "/gpfs01/home/uizas3/fluent_examples/mixing_elbow/fluent-20240410-124557-3345138.trn".
Auto-Transcript Start Time: 12:45:57, 10 Apr 2024
/gpfs01/software/easybuild-ada-uon/software/ANSYS/2022R2/v222/fluent/fluent22.2.0/bin/fluent -r22.2.0 3ddp -host -t48 -cnf=hmcomp001 -path/gpfs01/software/easybuild-ada-uon/software/ANSYS/2022R2/v222/fluent -ssh -cx hmcomp001:46871:35275
Starting /gpfs01/software/easybuild-ada-uon/software/ANSYS/2022R2/v222/fluent/fluent22.2.0/lnamd64/3ddp_host/fluent.22.2.0 host -cx hmcomp001:46871:35275 "(list (rpsetvar (QUOTE parallel/function) "fluent 3ddp -flux -node -r22.2.0 -t48 -pdefault -mpi=intel -cnf=hmcomp001 -ssh") (rpsetvar (QUOTE parallel/rhost) "") (rpsetvar (QUOTE parallel/ruser) "") (rpsetvar (QUOTE parallel/nprocs_string) "48") (rpsetvar (QUOTE parallel/auto-spawn?) #t) (rpsetvar (QUOTE parallel/trace-level) 0) (rpsetvar (QUOTE parallel/remote-shell) 1) (rpsetvar (QUOTE parallel/path) "/gpfs01/software/easybuild-ada-uon/software/ANSYS/2022R2/v222/fluent") (rpsetvar (QUOTE parallel/hostsfile) "hmcomp001") (rpsetvar (QUOTE gpuapp/devices) ""))"
Welcome to ANSYS Fluent 2022 R2
Copyright 1987-2022 ANSYS, Inc. All Rights Reserved.
Unauthorized use, distribution or duplication is prohibited.
This product is subject to U.S. laws governing export and re-export.
For full Legal Notice, see documentation.
Build Time: May 27 2022 08:43:47 EDT Build Id: 10212
Connected License Server List: 1055@128.243.45.60
--------------------------------------------------------------
This is an academic version of ANSYS FLUENT. Usage of this product
license is limited to the terms and conditions specified in your ANSYS
license form, additional terms section.
--------------------------------------------------------------
Host spawning Node 0 on machine "hmcomp001.int.ada.nottingham.ac.uk" (unix).
/gpfs01/software/easybuild-ada-uon/software/ANSYS/2022R2/v222/fluent/fluent22.2.0/bin/fluent -r22.2.0 3ddp -flux -node -t48 -pdefault -mpi=intel -cnf=hmcomp001 -ssh -mport 172.17.104.1:172.17.104.1:40329:0
Starting /gpfs01/software/easybuild-ada-uon/software/ANSYS/2022R2/v222/fluent/fluent22.2.0/multiport/mpi/lnamd64/intel2021/bin/mpirun -f /tmp/fluent-appfile.uizas3.3345581 --rsh=ssh -genv FI_PROVIDER tcp -genv FLUENT_ARCH lnamd64 -genv I_MPI_DEBUG 0 -genv I_MPI_ADJUST_REDUCE 2 -genv I_MPI_ADJUST_ALLREDUCE 2 -genv I_MPI_ADJUST_BCAST 8 -genv I_MPI_ADJUST_BARRIER 2 -genv I_MPI_ADJUST_ALLGATHER 2 -genv I_MPI_ADJUST_GATHER 2 -genv I_MPI_ADJUST_ALLTOALL 1 -genv I_MPI_ADJUST_SCATTER 2 -genv I_MPI_ADJUST_SCATTERV 2 -genv I_MPI_ADJUST_ALLGATHERV 2 -genv I_MPI_ADJUST_GATHERV 2 -genv I_MPI_PLATFORM auto -genv PYTHONHOME /gpfs01/software/easybuild-ada-uon/software/ANSYS/2022R2/v222/fluent/fluent22.2.0/../../commonfiles/CPython/3_7/linx64/Release/python -genv FLUENT_PROD_DIR /gpfs01/software/easybuild-ada-uon/software/ANSYS/2022R2/v222/fluent/fluent22.2.0 -genv FLUENT_AFFINITY 0 -genv I_MPI_PIN enable -genv KMP_AFFINITY disabled -machinefile /tmp/fluent-appfile.uizas3.3345581 -np 48 /gpfs01/software/easybuild-ada-uon/software/ANSYS/2022R2/v222/fluent/fluent22.2.0/lnamd64/3ddp_node/fluent_mpi.22.2.0 node -mpiw intel -pic default -mport 172.17.104.1:172.17.104.1:40329:0
--------------------------------------------------------------------------------------
ID Hostname Core O.S. PID Vendor
--------------------------------------------------------------------------------------
n0-47 hmcomp001.int.ada.no 48/96 Linux-64 3345798-3345845 AMD EPYC 9454 48-Core
host hmcomp001.int.ada.no Linux-64 3345372 AMD EPYC 9454 48-Core
MPI Option Selected: intel
Selected system interconnect: default
--------------------------------------------------------------------------------------
Cleanup script file is /gpfs01/home/uizas3/fluent_examples/mixing_elbow/cleanup-fluent-hmcomp001.int.ada.nottingham.ac.uk-3345372.sh
Warning:
Software rasterizer found, hardware acceleration will be disabled.
In the absence of hardware-accelerated drivers, the performance of all graphics operations will be severely affected. Make sure you have a supported graphics card, latest graphics driver, and a supported remote visualization tool with direct server-side rendering enabled. If you feel your system meets these requirements, try forcing the accelerated driver by using the command line flag (-driver <name>) or setting the HOOPS_PICTURE environment variable. Refer to the documentation for more details.
Reading journal file setcase.jou...
> ;; master file to submit Fluent jobs on ADA
define/ parametric-study/ solve/
display/ plot/ surface/
exit preferences/ switch-to-meshing-mode
file/ print-license-usage turbo-workflow/
mesh/ report/ views/
parallel/ server/
> ; Assuming the file is in the same directory as the submit directory, use the paths as follows. However if the file is in different directory, the file can be accessed using /file/read/<inside/here/mixing-elbow-mesh.msh.gz>
define/ parametric-study/ solve/
display/ plot/ surface/
exit preferences/ switch-to-meshing-mode
file/ print-license-usage turbo-workflow/
mesh/ report/ views/
parallel/ server/
> /file/read/mixing-elbow.msh.gz
Reading "\"| gunzip -c \\\"mixing-elbow.msh.gz\\\"\""...
Buffering for file scan...
ANSYS(R) TGrid(TM) 3D, parallel 18.1.0
Warning: Skipping edges zones section(s).
1813 nodes, binary.
1498 nodes, binary.
23075 nodes, binary.
169066 nodes, binary.
227 polygonal velocity-inlet faces, zone 101, binary.
131 polygonal velocity-inlet faces, zone 211, binary.
227 polygonal pressure-outlet faces, zone 275, binary.
7309 polygonal wall faces, zone 32, binary.
309080 polygonal interior faces, zone 206, binary.
71940 polyhedra cells, zone 207, binary.
Warning: reading 1 partition grid onto 48 compute node machine;
will auto partition.
71940 cell partition ids, zone 207, 1 partitions, binary.
Building...
mesh
auto partitioning mesh by Metis (fast),
distributing mesh
parts................................................,
faces................................................,
nodes................................................,
cells................................................,
bandwidth reduction using Reverse Cuthill-McKee: 1992/185 = 10.7676
materials,
interface,
domains,
zones,
Skipping thread 23 of domain 1 (not referenced by grid).
Skipping thread 24 of domain 1 (not referenced by grid).
Skipping thread 25 of domain 1 (not referenced by grid).
Skipping thread 26 of domain 1 (not referenced by grid).
Skipping thread 27 of domain 1 (not referenced by grid).
Skipping thread 204 of domain 1 (not referenced by grid).
Skipping thread 213 of domain 1 (not referenced by grid).
inlet-large
inlet-small
outlet
wall
interior-fluid
fluid
parallel,
Done.
> /mesh/check
Domain Extents:
x-coordinate: min (m) = -2.032000e-01, max (m) = 2.031624e-01
y-coordinate: min (m) = -2.286000e-01, max (m) = 2.032000e-01
z-coordinate: min (m) = -5.077680e-02, max (m) = 5.077639e-02
Volume statistics:
minimum volume (m3): 3.632011e-10
maximum volume (m3): 8.515699e-07
total volume (m3): 5.223785e-03
Face area statistics:
minimum face area (m2): 2.365637e-08
maximum face area (m2): 1.695394e-04
Checking mesh.....................................
Done.
> q
>
adjoint/ parallel/ server/
define/ parametric-study/ solve/
display/ plot/ surface/
exit preferences/ turbo-workflow/
file/ print-license-usage views/
mesh/ report/
> ;; These commands are usually in the form as mentioned below obtained using the console commands within Fluent.
;; define/models/Enable energy model? / Compute viscous energy dissipation? / Include pressure work in energy equation? / Include kinetic energy in energy equation? / Include diffusion at inlets?
adjoint/ parallel/ server/
define/ parametric-study/ solve/
display/ plot/ surface/
exit preferences/ turbo-workflow/
file/ print-license-usage views/
mesh/ report/
> /define/models/energy yes no no no no
> q
> q
>
adjoint/ parallel/ server/
define/ parametric-study/ solve/
display/ plot/ surface/
exit preferences/ turbo-workflow/
file/ print-license-usage views/
mesh/ report/
> /define/models/viscous/ke-standard yes
Adjusting the following setting:
Changing Discretization Scheme for Turbulent Kinetic Energy: from: Second Order Upwind to: First Order Upwind
> q
> q
>
adjoint/ parallel/ server/
define/ parametric-study/ solve/
display/ plot/ surface/
exit preferences/ turbo-workflow/
file/ print-license-usage views/
mesh/ report/
> /define/models/viscous/near-wall-treatment/enhanced-wall-treatment yes
> q
> q
>
adjoint/ parallel/ server/
define/ parametric-study/ solve/
display/ plot/ surface/
exit preferences/ turbo-workflow/
file/ print-license-usage views/
mesh/ report/
> /define/materials/copy-by-formula fluid h2o<l>
water-liquid copied from database.
>
adjoint/ parallel/ server/
define/ parametric-study/ solve/
display/ plot/ surface/
exit preferences/ turbo-workflow/
file/ print-license-usage views/
mesh/ report/
> /define/materials/change-create water-liquid water-liquid water-liquid is a fluid
yes
Density
constant 1000
yes
Cp (Specific Heat)
constant 4216
yes
Thermal Conductivity
constant 0.677
yes
Viscosity
constant 8e-4
no no no
>
adjoint/ parallel/ server/
define/ parametric-study/ solve/
display/ plot/ surface/
exit preferences/ turbo-workflow/
file/ print-license-usage views/
mesh/ report/
> /define/materials/list-materials
water-liquid
air
aluminum
> q
>
adjoint/ parallel/ server/
define/ parametric-study/ solve/
display/ plot/ surface/
exit preferences/ turbo-workflow/
file/ print-license-usage views/
mesh/ report/
> ; assign water (created material) to the cell zone.
/define/boundary-conditions/fluid (fluid)
fluid yes water no no no no 0 no 0 no 0 no 0 no 0 no 1 no yes no no no
>
adjoint/ parallel/ server/
define/ parametric-study/ solve/
display/ plot/ surface/
exit preferences/ turbo-workflow/
file/ print-license-usage views/
mesh/ report/
> ; set boundary conditions.
define/boundary-conditions/velocity-inlet (inlet-small inlet-large)
inlet-large no no yes yes no 0.4 no 0 no 293.15 no no no yes 5 4
>
adjoint/ parallel/ server/
define/ parametric-study/ solve/
display/ plot/ surface/
exit preferences/ turbo-workflow/
file/ print-license-usage views/
mesh/ report/
> define/boundary-conditions/velocity-inlet (inlet-small inlet-large)
inlet-small no no yes yes no 1.2 no 0 no 313.15 no no no yes 5 1
>
adjoint/ parallel/ server/
define/ parametric-study/ solve/
display/ plot/ surface/
exit preferences/ turbo-workflow/
file/ print-license-usage views/
mesh/ report/
>
adjoint/ parallel/ server/
define/ parametric-study/ solve/
display/ plot/ surface/
exit preferences/ turbo-workflow/
file/ print-license-usage views/
mesh/ report/
> define/boundary-conditions/pressure-outlet (outlet)
outlet yes no 0 no 300 no yes no no no yes 5 3 yes no no no
>
adjoint/ parallel/ server/
define/ parametric-study/ solve/
display/ plot/ surface/
exit preferences/ turbo-workflow/
file/ print-license-usage views/
mesh/ report/
> define/boundary-conditions/wall (wall)
wall 0 no 0 no no no 0 no no no no 1
>
adjoint/ parallel/ server/
define/ parametric-study/ solve/
display/ plot/ surface/
exit preferences/ turbo-workflow/
file/ print-license-usage views/
mesh/ report/
> ;24=coupled, 20=simple, 21=simplec, 22=piso
/solve/set/p-v-coupling 20
>
adjoint/ parallel/ server/
define/ parametric-study/ solve/
display/ plot/ surface/
exit preferences/ turbo-workflow/
file/ print-license-usage views/
mesh/ report/
> /solve/set/warped-face-gradient-correction/enable no
Warped-Face Gradient Correction disabled.
>
adjoint/ parallel/ server/
define/ parametric-study/ solve/
display/ plot/ surface/
exit preferences/ turbo-workflow/
file/ print-license-usage views/
mesh/ report/
>
adjoint/ parallel/ server/
define/ parametric-study/ solve/
display/ plot/ surface/
exit preferences/ turbo-workflow/
file/ print-license-usage views/
mesh/ report/
> ; create surface definition.
/solve/report-definitions/add outlet-temp-avg surface-massavg surface-names outlet () average-over 1 field temperature report-type surface-massavg
/solve/report-definitions/add/outlet-temp-avg> q
>
adjoint/ parallel/ server/
define/ parametric-study/ solve/
display/ plot/ surface/
exit preferences/ turbo-workflow/
file/ print-license-usage views/
mesh/ report/
> /solve/convergence-conditions/conv-reports/add outlet-temp stop-cri 1e-5 initial-values-to-ignore 20 active no print yes report-defs "outlet-temp-avg"
/solve/convergence-conditions//conv-reports/add/outlet-temp> q
/solve/convergence-conditions//conv-reports> q
/solve/convergence-conditions/>
condition conv-reports frequency
/solve/convergence-conditions/> /solve/cinvalid command [solve]
onvergence-conditions/conv-reports/add outlet-temp stop-cri 1e-5 initial-values-to-ignore 20 active yes print yes report-defs "outlet-temp-avg" q q q q
>
adjoint/ parallel/ server/
define/ parametric-study/ solve/
display/ plot/ surface/
exit preferences/ turbo-workflow/
file/ print-license-usage views/
mesh/ report/
> /solve/convergence-conditions/conv-reports/edit outlet-temp active yes
/solve/convergence-conditions//conv-reports/edit/outlet-temp> q
/solve/convergence-conditions//conv-reports> q
/solve/convergence-conditions/>
condition conv-reports frequency
/solve/convergence-conditions/>
condition conv-reports frequency
/solve/convergence-conditions/> /solve/iinvalid command [solve]
nitialize/hyb-initialization
>
adjoint/ parallel/ server/
define/ parametric-study/ solve/
display/ plot/ surface/
exit preferences/ turbo-workflow/
file/ print-license-usage views/
mesh/ report/
> it 150
Initialize using the hybrid initialization method.
Checking case topology...
-This case has both inlets & outlets
-Pressure information is not available at the boundaries.
Case will be initialized with constant pressure
iter scalar-0
1 1.000000e+00
2 9.540996e-05
3 1.002273e-05
4 2.949376e-06
5 7.676039e-07
6 4.627989e-07
7 1.859436e-07
8 1.370170e-07
9 6.555466e-08
10 4.675818e-08
Hybrid initialization is done.
iter continuity x-velocity y-velocity z-velocity energy k epsilon outlet-tem time/iter
1 1.0000e+00 7.3928e-05 7.8443e-05 3.5856e-05 2.9343e-05 1.0087e-01 1.3957e+01 0:00:14 149
2 4.8210e-01 2.8943e-05 3.2116e-05 1.3972e-05 3.1439e-05 5.6401e-02 5.5977e-01 0:00:28 148
3 2.9969e-01 1.8224e-05 2.4986e-05 7.0080e-06 2.5117e-05 4.3176e-02 3.8536e-01 0:00:25 147
4 2.3344e-01 1.5906e-05 2.2975e-05 4.8223e-06 2.1550e-05 3.5692e-02 3.0802e-01 0:00:22 146
5 1.8849e-01 1.5053e-05 2.1654e-05 4.2720e-06 1.9381e-05 3.0906e-02 2.3240e-01 0:00:20 145
6 1.4779e-01 1.3887e-05 1.9370e-05 4.1492e-06 1.7293e-05 2.8064e-02 4.6540e-01 0:00:18 144
7 1.2217e-01 1.2939e-05 1.8142e-05 4.1509e-06 1.5620e-05 2.5474e-02 3.0004e-01 0:00:16 143
8 1.0691e-01 1.2771e-05 1.8180e-05 4.2846e-06 1.4342e-05 2.3364e-02 2.0366e-01 0:00:15 142
9 9.6738e-02 1.2518e-05 1.8680e-05 4.6239e-06 1.3545e-05 2.1530e-02 1.5736e-01 0:00:14 141
10 9.0851e-02 1.2693e-05 1.9221e-05 4.9914e-06 1.3272e-05 2.0136e-02 1.5617e-01 0:00:13 140
11 8.9694e-02 1.2907e-05 2.0512e-05 5.5262e-06 1.3398e-05 1.8891e-02 1.4799e-01 0:00:12 139
iter continuity x-velocity y-velocity z-velocity energy k epsilon outlet-tem time/iter
12 9.1168e-02 1.3454e-05 2.2167e-05 6.0772e-06 1.3943e-05 1.7691e-02 1.3126e-01 0:00:12 138
13 9.2038e-02 1.4202e-05 2.4104e-05 6.6869e-06 1.4479e-05 1.6670e-02 1.1997e-01 0:00:12 137
14 9.0545e-02 1.5005e-05 2.6081e-05 7.3108e-06 1.5176e-05 1.5776e-02 1.1529e-01 0:00:11 136
15 8.9532e-02 1.5789e-05 2.8167e-05 7.9429e-06 1.5869e-05 1.4824e-02 9.7123e-02 0:00:11 135
16 8.9702e-02 1.6360e-05 3.0484e-05 8.5618e-06 1.6749e-05 1.4004e-02 8.7709e-02 0:00:11 134
17 8.8828e-02 1.6796e-05 3.2557e-05 9.0938e-06 1.7282e-05 1.3344e-02 8.4670e-02 0:00:10 133
18 8.8257e-02 1.7111e-05 3.4354e-05 9.6190e-06 1.8034e-05 1.2767e-02 8.0570e-02 0:00:10 132
19 8.5124e-02 1.7296e-05 3.6221e-05 1.0185e-05 1.8967e-05 1.2123e-02 6.8840e-02 0:00:10 131
20 8.0919e-02 1.7449e-05 3.7655e-05 1.0703e-05 1.9698e-05 1.1546e-02 6.0121e-02 0:00:10 130
21 7.6696e-02 1.7635e-05 3.8883e-05 1.1112e-05 2.0268e-05 1.1119e-02 5.4193e-02 0:00:10 129
Solution for report definition outlet-temp-avg has converged
22 7.3920e-02 1.7740e-05 4.0458e-05 1.1488e-05 2.0567e-05 1.0870e-02 4.8256e-02 5.6748e-06 0:00:12 128
iter continuity x-velocity y-velocity z-velocity energy k epsilon outlet-tem time/iter
Solution for report definition outlet-temp-avg has converged
23 7.2108e-02 1.7879e-05 4.1344e-05 1.1807e-05 2.0584e-05 1.0499e-02 4.1688e-02 9.7460e-06 0:00:12 127
Solution for report definition outlet-temp-avg has converged
24 7.1440e-02 1.8061e-05 4.1958e-05 1.2010e-05 2.0445e-05 1.0226e-02 3.5958e-02 3.0598e-06 0:00:12 126
Solution for report definition outlet-temp-avg has converged
25 7.0357e-02 1.8248e-05 4.2999e-05 1.2149e-05 2.0004e-05 1.0024e-02 3.0506e-02 4.7812e-06 0:00:12 125
Solution for report definition outlet-temp-avg has converged
26 6.9421e-02 1.8521e-05 4.3408e-05 1.2277e-05 1.9703e-05 9.7517e-03 2.5637e-02 3.7494e-06 0:00:11 124
Solution for report definition outlet-temp-avg has converged
27 7.0254e-02 1.8780e-05 4.3950e-05 1.2380e-05 1.9296e-05 9.6278e-03 2.2575e-02 3.2603e-06 0:00:11 123
Solution for report definition outlet-temp-avg has converged
28 7.0322e-02 1.9085e-05 4.4381e-05 1.2503e-05 1.8692e-05 9.5766e-03 2.1111e-02 1.1051e-06 0:00:11 122
Solution for report definition outlet-temp-avg has converged
29 6.9579e-02 1.9355e-05 4.4471e-05 1.2659e-05 1.8060e-05 9.5236e-03 2.0622e-02 8.8719e-07 0:00:11 121
Solution for report definition outlet-temp-avg has converged
30 6.8474e-02 1.9618e-05 4.4894e-05 1.2797e-05 1.7315e-05 9.6245e-03 2.0547e-02 1.5724e-06 0:00:11 120
Solution for report definition outlet-temp-avg has converged
31 6.6355e-02 1.9868e-05 4.4967e-05 1.2959e-05 1.6531e-05 9.7476e-03 2.0004e-02 2.3431e-06 0:00:11 119
Solution for report definition outlet-temp-avg has converged
32 6.4794e-02 2.0082e-05 4.4912e-05 1.3098e-05 1.5718e-05 9.8414e-03 1.9203e-02 1.8973e-06 0:00:11 118
Solution for report definition outlet-temp-avg has converged
33 6.3157e-02 2.0358e-05 4.5083e-05 1.3185e-05 1.4851e-05 9.9996e-03 1.8377e-02 1.8507e-06 0:00:11 117
iter continuity x-velocity y-velocity z-velocity energy k epsilon outlet-tem time/iter
Solution for report definition outlet-temp-avg has converged
34 6.1649e-02 2.0573e-05 4.5025e-05 1.3246e-05 1.3956e-05 1.0075e-02 1.7440e-02 5.1010e-07 0:00:11 116
Solution for report definition outlet-temp-avg has converged
35 5.9661e-02 2.0684e-05 4.4829e-05 1.3289e-05 1.3200e-05 1.0104e-02 1.6499e-02 6.9137e-07 0:00:11 115
Solution for report definition outlet-temp-avg has converged
36 5.7814e-02 2.0838e-05 4.4923e-05 1.3311e-05 1.2577e-05 1.0193e-02 1.5991e-02 1.7801e-06 0:00:10 114
Solution for report definition outlet-temp-avg has converged
37 5.6575e-02 2.0960e-05 4.4773e-05 1.3301e-05 1.2185e-05 1.0213e-02 1.5490e-02 1.1706e-06 0:00:10 113
Solution for report definition outlet-temp-avg has converged
38 5.5892e-02 2.0995e-05 4.4464e-05 1.3274e-05 1.1963e-05 1.0176e-02 1.4955e-02 1.5965e-06 0:00:10 112
Solution for report definition outlet-temp-avg has converged
39 5.5154e-02 2.1005e-05 4.4220e-05 1.3259e-05 1.1887e-05 1.0095e-02 1.4439e-02 1.9148e-06 0:00:10 111
Solution for report definition outlet-temp-avg has converged
40 5.4567e-02 2.0964e-05 4.3867e-05 1.3212e-05 1.1929e-05 1.0025e-02 1.4001e-02 2.0086e-06 0:00:10 110
Solution for report definition outlet-temp-avg has converged
41 5.4532e-02 2.0866e-05 4.3410e-05 1.3142e-05 1.1944e-05 9.9012e-03 1.3460e-02 1.9434e-06 0:00:10 109
Solution for report definition outlet-temp-avg has converged
42 5.4478e-02 2.0727e-05 4.3008e-05 1.3039e-05 1.1819e-05 9.7471e-03 1.2959e-02 1.8577e-06 0:00:10 108
Solution for report definition outlet-temp-avg has converged
43 5.4357e-02 2.0562e-05 4.2536e-05 1.2906e-05 1.1560e-05 9.5761e-03 1.2471e-02 1.4833e-06 0:00:10 107
Solution for report definition outlet-temp-avg has converged
44 5.4350e-02 2.0331e-05 4.2079e-05 1.2763e-05 1.1266e-05 9.3470e-03 1.1930e-02 1.4238e-06 0:00:10 106
iter continuity x-velocity y-velocity z-velocity energy k epsilon outlet-tem time/iter
Solution for report definition outlet-temp-avg has converged
45 5.4400e-02 2.0066e-05 4.1569e-05 1.2608e-05 1.1008e-05 9.0814e-03 1.1331e-02 2.1535e-06 0:00:10 105
Solution for report definition outlet-temp-avg has converged
46 5.4917e-02 1.9756e-05 4.1112e-05 1.2443e-05 1.0743e-05 8.8225e-03 1.0850e-02 4.5467e-06 0:00:09 104
Solution for report definition outlet-temp-avg has converged
47 5.3371e-02 1.9400e-05 4.0581e-05 1.2236e-05 1.0504e-05 8.5389e-03 1.0458e-02 1.2925e-06 0:00:09 103
Solution for report definition outlet-temp-avg has converged
48 5.3486e-02 1.9036e-05 4.0042e-05 1.2045e-05 1.0230e-05 8.2338e-03 9.9811e-03 5.1224e-06 0:00:09 102
Solution for report definition outlet-temp-avg has converged
49 5.2925e-02 1.8677e-05 3.9417e-05 1.1844e-05 9.8953e-06 7.8914e-03 9.4755e-03 5.8914e-06 0:00:09 101
Solution for report definition outlet-temp-avg has converged
50 5.2179e-02 1.8314e-05 3.8751e-05 1.1635e-05 9.5881e-06 7.5208e-03 8.9518e-03 6.2127e-06 0:00:09 100
Solution for report definition outlet-temp-avg has converged
51 5.1529e-02 1.7970e-05 3.8040e-05 1.1432e-05 9.2820e-06 7.1269e-03 8.4066e-03 6.2521e-06 0:00:09 99
Solution for report definition outlet-temp-avg has converged
52 5.1018e-02 1.7609e-05 3.7298e-05 1.1215e-05 9.0116e-06 6.7475e-03 7.9122e-03 7.7702e-06 0:00:09 98
Solution for report definition outlet-temp-avg has converged
53 5.0917e-02 1.7245e-05 3.6481e-05 1.0962e-05 8.7431e-06 6.3767e-03 7.4812e-03 8.4197e-06 0:00:09 97
54 5.0523e-02 1.6822e-05 3.5573e-05 1.0688e-05 8.4761e-06 6.0085e-03 7.0874e-03 1.0033e-05 0:00:09 96
55 4.9881e-02 1.6291e-05 3.4589e-05 1.0365e-05 8.1879e-06 5.6320e-03 6.6213e-03 1.0583e-05 0:00:08 95
iter continuity x-velocity y-velocity z-velocity energy k epsilon outlet-tem time/iter
Solution for report definition outlet-temp-avg has converged
56 4.9138e-02 1.5682e-05 3.3567e-05 1.0033e-05 7.8983e-06 5.2910e-03 6.1956e-03 9.1602e-06 0:00:08 94
57 4.8770e-02 1.5035e-05 3.2514e-05 9.6764e-06 7.5428e-06 4.9421e-03 5.8335e-03 1.0866e-05 0:00:08 93
Solution for report definition outlet-temp-avg has converged
58 4.7580e-02 1.4346e-05 3.1433e-05 9.3078e-06 7.1665e-06 4.5873e-03 5.4860e-03 7.3927e-06 0:00:08 92
Solution for report definition outlet-temp-avg has converged
59 4.6661e-02 1.3669e-05 3.0263e-05 8.9268e-06 6.7691e-06 4.2446e-03 5.1658e-03 5.8446e-06 0:00:08 91
Solution for report definition outlet-temp-avg has converged
60 4.5712e-02 1.2997e-05 2.8991e-05 8.5421e-06 6.3977e-06 3.9281e-03 4.8603e-03 3.1686e-06 0:00:08 90
Solution for report definition outlet-temp-avg has converged
61 4.4979e-02 1.2337e-05 2.7694e-05 8.1485e-06 5.9878e-06 3.6430e-03 4.5718e-03 5.9378e-07 0:00:08 89
Solution for report definition outlet-temp-avg has converged
62 4.3791e-02 1.1708e-05 2.6338e-05 7.7447e-06 5.6148e-06 3.3824e-03 4.2939e-03 3.6576e-06 0:00:08 88
Solution for report definition outlet-temp-avg has converged
63 4.2503e-02 1.1056e-05 2.4884e-05 7.3423e-06 5.2853e-06 3.1565e-03 4.0347e-03 7.6137e-06 0:00:10 87
64 4.1291e-02 1.0369e-05 2.3396e-05 6.9521e-06 4.9757e-06 2.9492e-03 3.7830e-03 1.1112e-05 0:00:10 86
65 4.0128e-02 9.6974e-06 2.1914e-05 6.5673e-06 4.7065e-06 2.7503e-03 3.5448e-03 1.3367e-05 0:00:09 85
66 3.8949e-02 9.0487e-06 2.0469e-05 6.2060e-06 4.4482e-06 2.5516e-03 3.3123e-03 1.4341e-05 0:00:10 84
iter continuity x-velocity y-velocity z-velocity energy k epsilon outlet-tem time/iter
67 3.7567e-02 8.4322e-06 1.9090e-05 5.8722e-06 4.1973e-06 2.3615e-03 3.0939e-03 1.4449e-05 0:00:09 83
68 3.5972e-02 7.8528e-06 1.7795e-05 5.5563e-06 3.9539e-06 2.1815e-03 2.8714e-03 1.4412e-05 0:00:09 82
69 3.4054e-02 7.3125e-06 1.6573e-05 5.2650e-06 3.7004e-06 2.0114e-03 2.6601e-03 1.0688e-05 0:00:11 81
Solution for report definition outlet-temp-avg has converged
70 3.2206e-02 6.8382e-06 1.5472e-05 4.9714e-06 3.4232e-06 1.8519e-03 2.4637e-03 8.7327e-06 0:00:10 80
Solution for report definition outlet-temp-avg has converged
71 3.0562e-02 6.3960e-06 1.4433e-05 4.6837e-06 3.1310e-06 1.6999e-03 2.2803e-03 5.1729e-06 0:00:10 79
Solution for report definition outlet-temp-avg has converged
72 2.8808e-02 5.9500e-06 1.3418e-05 4.3912e-06 2.8367e-06 1.5559e-03 2.1086e-03 9.9984e-07 0:00:09 78
Solution for report definition outlet-temp-avg has converged
73 2.7256e-02 5.5199e-06 1.2458e-05 4.0984e-06 2.5488e-06 1.4177e-03 1.9484e-03 8.3513e-07 0:00:09 77
Solution for report definition outlet-temp-avg has converged
74 2.5784e-02 5.0875e-06 1.1572e-05 3.8117e-06 2.2835e-06 1.2883e-03 1.7990e-03 2.5949e-06 0:00:08 76
Solution for report definition outlet-temp-avg has converged
75 2.4389e-02 4.6758e-06 1.0746e-05 3.5262e-06 2.0528e-06 1.1687e-03 1.6627e-03 3.2201e-06 0:00:08 75
Solution for report definition outlet-temp-avg has converged
76 2.3124e-02 4.2856e-06 9.9968e-06 3.2515e-06 1.8500e-06 1.0593e-03 1.5381e-03 3.1277e-06 0:00:07 74
Solution for report definition outlet-temp-avg has converged
77 2.1962e-02 3.9221e-06 9.2981e-06 2.9966e-06 1.6850e-06 9.5756e-04 1.4229e-03 2.6092e-06 0:00:07 73
iter continuity x-velocity y-velocity z-velocity energy k epsilon outlet-tem time/iter
Solution for report definition outlet-temp-avg has converged
78 2.0915e-02 3.5912e-06 8.6503e-06 2.7579e-06 1.5507e-06 8.6345e-04 1.3202e-03 1.6758e-06 0:00:07 72
Solution for report definition outlet-temp-avg has converged
79 1.9871e-02 3.2971e-06 8.0382e-06 2.5389e-06 1.4367e-06 7.7839e-04 1.2244e-03 9.1635e-07 0:00:07 71
Solution for report definition outlet-temp-avg has converged
80 1.8770e-02 3.0361e-06 7.4541e-06 2.3387e-06 1.3413e-06 7.0323e-04 1.1357e-03 2.7111e-07 0:00:07 70
Solution for report definition outlet-temp-avg has converged
81 1.7599e-02 2.8045e-06 6.9072e-06 2.1588e-06 1.2651e-06 6.3684e-04 1.0509e-03 1.3045e-06 0:00:06 69
Solution for report definition outlet-temp-avg has converged
82 1.6505e-02 2.5986e-06 6.3895e-06 1.9957e-06 1.1934e-06 5.7939e-04 9.7003e-04 2.0336e-06 0:00:06 68
Solution for report definition outlet-temp-avg has converged
83 1.5532e-02 2.4117e-06 5.8916e-06 1.8475e-06 1.1175e-06 5.2975e-04 8.9427e-04 2.6423e-06 0:00:06 67
Solution for report definition outlet-temp-avg has converged
84 1.4654e-02 2.2395e-06 5.4216e-06 1.7115e-06 1.0405e-06 4.8625e-04 8.2252e-04 3.0106e-06 0:00:06 66
Solution for report definition outlet-temp-avg has converged
85 1.3879e-02 2.0783e-06 4.9810e-06 1.5875e-06 9.6456e-07 4.4802e-04 7.5577e-04 3.1190e-06 0:00:06 65
Solution for report definition outlet-temp-avg has converged
86 1.3102e-02 1.9242e-06 4.5686e-06 1.4724e-06 8.9174e-07 4.1423e-04 6.9489e-04 2.9262e-06 0:00:06 64
Solution for report definition outlet-temp-avg has converged
87 1.2321e-02 1.7755e-06 4.1826e-06 1.3648e-06 8.2429e-07 3.8355e-04 6.3837e-04 2.5748e-06 0:00:06 63
Solution for report definition outlet-temp-avg has converged
88 1.1520e-02 1.6350e-06 3.8208e-06 1.2671e-06 7.6244e-07 3.5591e-04 5.8542e-04 2.2112e-06 0:00:06 62
iter continuity x-velocity y-velocity z-velocity energy k epsilon outlet-tem time/iter
Solution for report definition outlet-temp-avg has converged
89 1.0732e-02 1.5035e-06 3.4888e-06 1.1760e-06 7.0519e-07 3.3045e-04 5.3712e-04 1.8084e-06 0:00:06 61
Solution for report definition outlet-temp-avg has converged
90 9.9713e-03 1.3797e-06 3.1861e-06 1.0905e-06 6.5234e-07 3.0646e-04 4.9272e-04 1.3085e-06 0:00:05 60
Solution for report definition outlet-temp-avg has converged
91 9.2422e-03 1.2659e-06 2.9120e-06 1.0099e-06 6.0261e-07 2.8440e-04 4.5138e-04 1.0661e-06 0:00:05 59
Solution for report definition outlet-temp-avg has converged
92 8.5292e-03 1.1604e-06 2.6658e-06 9.3558e-07 5.5630e-07 2.6446e-04 4.1286e-04 7.9171e-07 0:00:05 58
Solution for report definition outlet-temp-avg has converged
93 7.8381e-03 1.0601e-06 2.4380e-06 8.6663e-07 5.1346e-07 2.4614e-04 3.7755e-04 5.4018e-07 0:00:05 57
Solution for report definition outlet-temp-avg has converged
94 7.2270e-03 9.6775e-07 2.2338e-06 8.0215e-07 4.7286e-07 2.2926e-04 3.4612e-04 4.2717e-07 0:00:05 56
Solution for report definition outlet-temp-avg has converged
95 6.6462e-03 8.8372e-07 2.0478e-06 7.4192e-07 4.3584e-07 2.1398e-04 3.1801e-04 4.2956e-07 0:00:05 55
Solution for report definition outlet-temp-avg has converged
96 6.0999e-03 8.0801e-07 1.8792e-06 6.8627e-07 4.0254e-07 2.0009e-04 2.9230e-04 4.5943e-07 0:00:05 54
Solution for report definition outlet-temp-avg has converged
97 5.6269e-03 7.3973e-07 1.7251e-06 6.3575e-07 3.7280e-07 1.8716e-04 2.6895e-04 4.8088e-07 0:00:05 53
Solution for report definition outlet-temp-avg has converged
98 5.2018e-03 6.7700e-07 1.5841e-06 5.9016e-07 3.4608e-07 1.7503e-04 2.4765e-04 5.2355e-07 0:00:05 52
Solution for report definition outlet-temp-avg has converged
99 4.8321e-03 6.2117e-07 1.4534e-06 5.4889e-07 3.2228e-07 1.6363e-04 2.2849e-04 5.8769e-07 0:00:05 51
iter continuity x-velocity y-velocity z-velocity energy k epsilon outlet-tem time/iter
Solution for report definition outlet-temp-avg has converged
100 4.5003e-03 5.7272e-07 1.3322e-06 5.1285e-07 3.0213e-07 1.5305e-04 2.1085e-04 6.9168e-07 0:00:04 50
Solution for report definition outlet-temp-avg has converged
101 4.3606e-03 5.3181e-07 1.2205e-06 4.8078e-07 2.8217e-07 1.4375e-04 1.9696e-04 8.3571e-07 0:00:04 49
Solution for report definition outlet-temp-avg has converged
102 3.9348e-03 4.9474e-07 1.1221e-06 4.5228e-07 2.6608e-07 1.3487e-04 1.8366e-04 7.9450e-07 0:00:04 48
Solution for report definition outlet-temp-avg has converged
103 3.7977e-03 4.6211e-07 1.0308e-06 4.2656e-07 2.5039e-07 1.2698e-04 1.7257e-04 8.2575e-07 0:00:04 47
Solution for report definition outlet-temp-avg has converged
104 3.4440e-03 4.3295e-07 9.5137e-07 4.0265e-07 2.3688e-07 1.1954e-04 1.6205e-04 8.6844e-07 0:00:04 46
Solution for report definition outlet-temp-avg has converged
105 3.3361e-03 4.0641e-07 8.7825e-07 3.8096e-07 2.2316e-07 1.1321e-04 1.5386e-04 7.6836e-07 0:00:04 45
Solution for report definition outlet-temp-avg has converged
106 3.0298e-03 3.8405e-07 8.1451e-07 3.6041e-07 2.1138e-07 1.0725e-04 1.4586e-04 8.6574e-07 0:00:04 44
Solution for report definition outlet-temp-avg has converged
107 2.9353e-03 3.6191e-07 7.5727e-07 3.4125e-07 2.0003e-07 1.0213e-04 1.3958e-04 6.3646e-07 0:00:04 43
Solution for report definition outlet-temp-avg has converged
108 2.6620e-03 3.4349e-07 7.0762e-07 3.2322e-07 1.9025e-07 9.7341e-05 1.3312e-04 7.6168e-07 0:00:04 42
Solution for report definition outlet-temp-avg has converged
109 2.5857e-03 3.2465e-07 6.6333e-07 3.0695e-07 1.8162e-07 9.3328e-05 1.2788e-04 4.8564e-07 0:00:04 41
Solution for report definition outlet-temp-avg has converged
110 2.3436e-03 3.0879e-07 6.2512e-07 2.9158e-07 1.7478e-07 8.9572e-05 1.2239e-04 6.3675e-07 0:00:04 40
iter continuity x-velocity y-velocity z-velocity energy k epsilon outlet-tem time/iter
Solution for report definition outlet-temp-avg has converged
111 2.2731e-03 2.9281e-07 5.9094e-07 2.7809e-07 1.6901e-07 8.6349e-05 1.1782e-04 3.2767e-07 0:00:04 39
Solution for report definition outlet-temp-avg has converged
112 2.0664e-03 2.7932e-07 5.6081e-07 2.6535e-07 1.6481e-07 8.3216e-05 1.1302e-04 4.7258e-07 0:00:03 38
Solution for report definition outlet-temp-avg has converged
113 2.0041e-03 2.6643e-07 5.3448e-07 2.5416e-07 1.6181e-07 8.0493e-05 1.0890e-04 1.8905e-07 0:00:03 37
Solution for report definition outlet-temp-avg has converged
114 1.8308e-03 2.5650e-07 5.1122e-07 2.4357e-07 1.5960e-07 7.7705e-05 1.0452e-04 3.0663e-07 0:00:03 36
Solution for report definition outlet-temp-avg has converged
115 1.7928e-03 2.4604e-07 4.9117e-07 2.3453e-07 1.5693e-07 7.5156e-05 1.0065e-04 8.1387e-08 0:00:03 35
Solution for report definition outlet-temp-avg has converged
116 1.6570e-03 2.3743e-07 4.7188e-07 2.2588e-07 1.5450e-07 7.2495e-05 9.6442e-05 1.5274e-07 0:00:03 34
Solution for report definition outlet-temp-avg has converged
117 1.6389e-03 2.2924e-07 4.5421e-07 2.1810e-07 1.5138e-07 6.9926e-05 9.2705e-05 3.0791e-09 0:00:03 33
Solution for report definition outlet-temp-avg has converged
118 1.5291e-03 2.2187e-07 4.3611e-07 2.1036e-07 1.4805e-07 6.7218e-05 8.8632e-05 2.6643e-08 0:00:03 32
Solution for report definition outlet-temp-avg has converged
119 1.5186e-03 2.1469e-07 4.1908e-07 2.0307e-07 1.4400e-07 6.4643e-05 8.5082e-05 6.6114e-08 0:00:03 31
Solution for report definition outlet-temp-avg has converged
120 1.4199e-03 2.0827e-07 4.0147e-07 1.9597e-07 1.4007e-07 6.1974e-05 8.1328e-05 4.9321e-08 0:00:03 30
Solution for report definition outlet-temp-avg has converged
121 1.4081e-03 2.0159e-07 3.8516e-07 1.8892e-07 1.3533e-07 5.9478e-05 7.8221e-05 9.3350e-08 0:00:03 29
iter continuity x-velocity y-velocity z-velocity energy k epsilon outlet-tem time/iter
Solution for report definition outlet-temp-avg has converged
122 1.3174e-03 1.9487e-07 3.6891e-07 1.8200e-07 1.3050e-07 5.6938e-05 7.4878e-05 9.3105e-08 0:00:03 28
Solution for report definition outlet-temp-avg has converged
123 1.3045e-03 1.8798e-07 3.5349e-07 1.7502e-07 1.2505e-07 5.4569e-05 7.2089e-05 1.0046e-07 0:00:02 27
Solution for report definition outlet-temp-avg has converged
124 1.2191e-03 1.8087e-07 3.3850e-07 1.6820e-07 1.1965e-07 5.2219e-05 6.9143e-05 1.1756e-07 0:00:02 26
Solution for report definition outlet-temp-avg has converged
125 1.2040e-03 1.7372e-07 3.2387e-07 1.6124e-07 1.1398e-07 5.0023e-05 6.6557e-05 9.5136e-08 0:00:02 25
Solution for report definition outlet-temp-avg has converged
126 1.1205e-03 1.6613e-07 3.0991e-07 1.5445e-07 1.0852e-07 4.7839e-05 6.3831e-05 1.2486e-07 0:00:02 24
Solution for report definition outlet-temp-avg has converged
127 1.1007e-03 1.5856e-07 2.9616e-07 1.4755e-07 1.0269e-07 4.5744e-05 6.1401e-05 8.4865e-08 0:00:02 23
Solution for report definition outlet-temp-avg has converged
128 1.0234e-03 1.5092e-07 2.8363e-07 1.4105e-07 9.7086e-08 4.3658e-05 5.8861e-05 1.2521e-07 0:00:02 22
Solution for report definition outlet-temp-avg has converged
129 1.0026e-03 1.4344e-07 2.7082e-07 1.3435e-07 9.1478e-08 4.1653e-05 5.6580e-05 7.0944e-08 0:00:02 21
Solution for report definition outlet-temp-avg has converged
! 130 report definition solution is converged
130 9.3227e-04 1.3617e-07 2.5940e-07 1.2828e-07 8.6051e-08 3.9691e-05 5.4177e-05 1.0552e-07 0:00:02 20
! 130 solution is converged
>
adjoint/ parallel/ server/
define/ parametric-study/ solve/
display/ plot/ surface/
exit preferences/ turbo-workflow/
file/ print-license-usage views/
mesh/ report/
> file/write-case-data ,Fast-loading "/gpfs01/software/easybuild-ada-uon/software/ANSYS/2022R2/v222/fluent/fluent22.2.0/addons/afd/lib/hdfio.bin"
Done.
Writing to hmcomp001.int.ada.nottingham.ac.uk:"/gpfs01/home/uizas3/fluent_examples/mixing_elbow/mixing-elbow.cas.h5" in NODE0 mode and compression level 1 ...
71940 cells, 1 zone ...
316974 faces, 5 zones ...
195452 nodes, 1 zone ...
Done.
Done.
Writing to hmcomp001.int.ada.nottingham.ac.uk:"/gpfs01/home/uizas3/fluent_examples/mixing_elbow/mixing-elbow.dat.h5" in NODE0 mode and compression level 1 ...
Writing results.
Done.
>
adjoint/ parallel/ server/
define/ parametric-study/ solve/
display/ plot/ surface/
exit preferences/ turbo-workflow/
file/ print-license-usage views/
mesh/ report/
> /display/save-picture residuals%i.jpg
>
adjoint/ parallel/ server/
define/ parametric-study/ solve/
display/ plot/ surface/
exit preferences/ turbo-workflow/
file/ print-license-usage views/
mesh/ report/
> /report/system/time-stats
---------------------------------------------
| CPU Time Usage (Seconds)
ID | User Kernel Elapsed
---------------------------------------------
host | 2 0 -
n0 | 11 11 -
n1 | 5 20 -
n2 | 5 20 -
n3 | 5 20 -
n4 | 5 20 -
n5 | 5 20 -
n6 | 5 20 -
n7 | 5 20 -
n8 | 5 20 -
n9 | 5 20 -
n10 | 5 20 -
n11 | 5 20 -
n12 | 5 21 -
n13 | 5 20 -
n14 | 5 20 -
n15 | 5 20 -
n16 | 5 20 -
n17 | 5 20 -
n18 | 5 20 -
---------------------------------------------
| CPU Time Usage (Seconds)
ID | User Kernel Elapsed
---------------------------------------------
n19 | 5 20 -
n20 | 5 20 -
n21 | 5 20 -
n22 | 5 20 -
n23 | 5 20 -
n24 | 5 21 -
n25 | 6 20 -
n26 | 5 20 -
n27 | 6 20 -
n28 | 5 21 -
n29 | 5 21 -
n30 | 5 20 -
n31 | 6 20 -
n32 | 5 20 -
n33 | 5 20 -
n34 | 5 20 -
n35 | 6 20 -
n36 | 5 20 -
n37 | 6 20 -
n38 | 5 20 -
---------------------------------------------
| CPU Time Usage (Seconds)
ID | User Kernel Elapsed
---------------------------------------------
n39 | 6 20 -
n40 | 6 20 -
n41 | 6 20 -
n42 | 5 20 -
n43 | 5 20 -
n44 | 6 20 -
n45 | 6 20 -
n46 | 6 20 -
n47 | 5 20 -
---------------------------------------------
Total | 259 955 -
---------------------------------------------
Model Timers (Host)
Flow Model Time: 0.053 sec (CPU), count 130
Other Models Time: 0.003 sec (CPU)
Total Time: 0.056 sec (CPU)
Model Timers
Flow Model Time: 2.667 sec (WALL), 2.564 sec (CPU), count 130
Turbulence Model Time: 0.661 sec (WALL), 0.643 sec (CPU), count 130
Temperature Model Time: 2.874 sec (WALL), 2.788 sec (CPU), count 130
Other Models Time: 0.013 sec (WALL)
Total Time: 6.215 sec (WALL)
Performance Timer for 130 iterations on 48 compute nodes
Average wall-clock time per iteration: 0.049 sec
Global reductions per iteration: 83 ops
Global reductions time per iteration: 0.000 sec (0.0%)
Message count per iteration: 133986 messages
Data transfer per iteration: 48.405 MB
LE solves per iteration: 7 solves
LE wall-clock time per iteration: 0.040 sec (82.7%)
LE global solves per iteration: 5 solves
LE global wall-clock time per iteration: 0.004 sec (9.1%)
LE global matrix maximum size: 218
AMG cycles per iteration: 10.992 cycles
Relaxation sweeps per iteration: 510 sweeps
Relaxation exchanges per iteration: 0 exchanges
LE early protections (stall) per iteration: 0.015 times
LE early protections (divergence) per iteration: 0.000 times
Total SVARS touched: 377
Total wall-clock time: 6.320 sec
Simulation wall-clock time for 130 iterations 13.648209 sec
> /report/system/proc-stats
------------------------------------------------------------------------------
| Virtual Mem Usage (GB) | Resident Mem Usage(GB) |
ID | Current Peak | Current Peak | Page Faults
------------------------------------------------------------------------------
host | 1.02579 1.06923 | 0.485085 0.496124 | 0
n0 | 7.87799 7.93692 | 0.2029 0.21228 | 0
n1 | 4.73282 4.73282 | 0.172394 0.172394 | 0
n2 | 4.73312 4.73312 | 0.17104 0.17104 | 0
n3 | 4.73283 4.73283 | 0.172344 0.172344 | 0
n4 | 4.73166 4.75199 | 0.169785 0.213352 | 0
n5 | 4.73334 4.73334 | 0.173126 0.173126 | 0
n6 | 4.7328 4.75304 | 0.170837 0.21476 | 0
n7 | 4.73197 4.75218 | 0.171787 0.216827 | 0
n8 | 4.73222 4.73222 | 0.169956 0.169956 | 0
n9 | 4.7321 4.75219 | 0.171715 0.216625 | 0
n10 | 4.73191 4.73191 | 0.169716 0.169716 | 0
n11 | 4.73161 4.73161 | 0.171368 0.171368 | 0
n12 | 4.73166 4.73166 | 0.169552 0.169552 | 0
n13 | 4.73156 4.73156 | 0.170898 0.170898 | 0
n14 | 4.73148 4.73148 | 0.169296 0.169296 | 0
n15 | 4.73185 4.73185 | 0.171318 0.171318 | 0
n16 | 4.73256 4.73256 | 0.170174 0.170174 | 0
n17 | 4.73198 4.73198 | 0.171528 0.171528 | 0
n18 | 4.73307 4.73307 | 0.170795 0.170795 | 0
------------------------------------------------------------------------------
| Virtual Mem Usage (GB) | Resident Mem Usage(GB) |
ID | Current Peak | Current Peak | Page Faults
------------------------------------------------------------------------------
n19 | 4.73145 4.73145 | 0.170818 0.170818 | 0
n20 | 4.73217 4.73217 | 0.169998 0.169998 | 0
n21 | 4.7318 4.7521 | 0.171574 0.216614 | 0
n22 | 4.73241 4.73241 | 0.170475 0.170475 | 0
n23 | 4.73187 4.75144 | 0.171719 0.216057 | 0
n24 | 4.73176 4.75086 | 0.16972 0.21217 | 0
n25 | 4.73166 4.75173 | 0.171333 0.216061 | 0
n26 | 4.73184 4.75191 | 0.169857 0.213398 | 0
n27 | 4.73174 4.75146 | 0.171501 0.215794 | 0
n28 | 4.7312 4.75152 | 0.168964 0.212589 | 0
n29 | 4.72974 4.72974 | 0.169308 0.169308 | 0
n30 | 4.73185 4.73185 | 0.169865 0.169865 | 0
n31 | 4.73207 4.73207 | 0.171623 0.171623 | 0
n32 | 4.73184 4.73184 | 0.169689 0.169689 | 0
n33 | 4.73244 4.75269 | 0.172302 0.217434 | 0
n34 | 4.7322 4.75234 | 0.170185 0.215214 | 0
n35 | 4.7315 4.75166 | 0.171196 0.216148 | 0
n36 | 4.73148 4.7516 | 0.169495 0.214237 | 0
n37 | 4.73189 4.75224 | 0.171837 0.216702 | 0
n38 | 4.73221 4.75232 | 0.1702 0.214935 | 0
------------------------------------------------------------------------------
| Virtual Mem Usage (GB) | Resident Mem Usage(GB) |
ID | Current Peak | Current Peak | Page Faults
------------------------------------------------------------------------------
n39 | 4.73194 4.7517 | 0.171497 0.216103 | 0
n40 | 4.73186 4.75183 | 0.169758 0.214527 | 0
n41 | 4.73168 4.75185 | 0.171398 0.216034 | 0
n42 | 4.73196 4.75216 | 0.169998 0.214966 | 0
n43 | 4.73161 4.75106 | 0.171574 0.215458 | 0
n44 | 4.73107 4.75097 | 0.169056 0.213722 | 0
n45 | 4.73179 4.75191 | 0.17157 0.216179 | 0
n46 | 4.73146 4.75148 | 0.169376 0.213978 | 0
n47 | 4.73112 4.75094 | 0.170876 0.215153 | 0
------------------------------------------------------------------------------
Total | 231.304 231.927 | 8.71238 9.88872 | 0
------------------------------------------------------------------------------
------------------------------------------------------------------------------------------------
| Virtual Mem Usage (GB) | Resident Mem Usage(GB) | System Mem (GB)
Hostname | Current Peak | Current Peak |
------------------------------------------------------------------------------------------------
hmcomp001.int.ada.no| 231.304 231.927 | 8.71238 9.88872 | 1511.63
------------------------------------------------------------------------------------------------
Total | 231.304 231.927 | 8.71238 9.88872 |
------------------------------------------------------------------------------------------------
>
adjoint/ parallel/ server/
define/ parametric-study/ solve/
display/ plot/ surface/
exit preferences/ turbo-workflow/
file/ print-license-usage views/
mesh/ report/
>
adjoint/ parallel/ server/
define/ parametric-study/ solve/
display/ plot/ surface/
exit preferences/ turbo-workflow/
file/ print-license-usage views/
mesh/ report/
> exit
Auto-Transcript Stop Time: 12:46:36, 10 Apr 2024
Total Transcript Time: 0 Minute 38 Second.
Automatic transcript closed.
As our commands are set in place that can save an image, we see the image of residuals as shown below. The same can be done for any surface average property pre-defined with the journal commands.
Meshing#
A mesh file is the file containting the mesh of the geometry you want to simulate in Fluent. One could very well use a CAD file (Linux Fluent readable format) itself such as an STL or a STEP file in place of a mesh file. In such a case, a journaling file will need to file had additional steps for meshing such as defining cell types, surface name tags, zone details, maximum and minimum cell size, boundary layer details etc. In case the starting point is a CAD file, the journal file will also update accordingly with the steps that my look as follows,
Import CAD file.
Set up boundary names and relevant settings.
Set up meshing parameters necessary for the model, such as min size, max size of cells, first boundary layer length etc.
Mesh
Switch to Fluent solver.
Set up CFD parameters such as models, materials, boundary conditions etc.
Run Fluent solver.
Steps 6 and 7 are indicated via an example in the journal file indicated above.
SLURM#
Slurm job submission script (e.g. named as say, run_ansys.slurm) is the script that will be submitted to the scheduler to run your Fluent jobs. A sample script is shown:
#!/bin/bash
# SLURM job script to run Ansys fluent in parallel on ADA
#SBATCH --job-name=myjob              ## names the case to view later.
#SBATCH --nodes=1                     ## requested number of nodes.
#SBATCH --ntasks=48                   ## requested number of cores.
#SBATCH --partition=hmemq             ## requested partition.
#SBATCH --time 0:10:00                ## requested time limit

module load ansys-uoneasy/2022R2 ## Load the correct version of Ansys (currently 2022R2)

echo "#######################################################################" >> out.txt
echo No of tasks: $SLURM_NTASKS >> out.txt
echo "#######################################################################" >> out.txt
echo

node_list=$(scontrol show hostname ${SLURM_NODELIST} | sort -u) #finds the details of the acquired node

echo $node_list >> out.txt

echo
echo "fluent commands start from here!!!" >> out.txt
echo

## The master fluent command that opens fluent in no-gui format on HPC system.
fluent 3ddp -ssh -t$SLURM_NTASKS -mpi=intel -pinfiniband -cnf=$node_list -gu -i setcase.jou >> out.txt

scontrol realease $SLURM_JOB_ID
The directive: #SBATCH --ntasks=40
represents the CPU cores you want to use for your simulations. Note that this is a function of the partition that will run your job. Some partitions on ADA have 96 CPU cores per node. In the above example, the defq partition, which is the default partition, has 96 cores, out of which 48 has been requested on 1 node. If more resources are requested then the avilable resource-based error will be prompted. See the following for meaning of various errors.
Reason |
Description |
|---|---|
Resources |
All suitable resources are in use |
Priority |
There are higher priority jobs in queue |
AssocGrpCPULimit |
The maximum number of CPU cores allowed for running jobs has been reached |
QOSMinMemory |
The memory has not been defined, or has been set too low with ‘–mem’ option |
QOSNotAllowed |
An inappropriate partition has been selected |
ReqNodeNotAvail |
An inappropriate partition has been selected |
The directive: #SBATCH --nodes=1
requests one node. For example, for the defq partition, which has 96 CPU cores per node:
SBATCH --ntasks = 200 ## Requesting 200 (>192) cores, with 2 nodes on defq will give resource error

SBATCH --nodes = 2 ## Requesting 1 node and 100 cores will also be  resource error, as defq has 96 cores per node.
Hence it is recommended to check the upper limit of the partition you are submitting to, and then select the node and ntasks for the job. The default partition will be defq which has 96 CPU cores per node.
The directive: #SBATCH --time =0:10:00
requests the time for which the job should run on the partition. In this example, it is set to 8 hours. Note that if your job exceeds this time, the job will be terminated by SLURM.
The meaning of the fluent’s executable call flags are as follows,
3ddp, uses 3-dimensional, double precision model of the fluent solver.
-ssh is using the SSH protocol to launch MPI processes.
-meshing: This flag opens the fluent meshing. If the user wants the solver, simply remove this flag. This is also done in this example, because the starting point is a mesh import to Fluent solver.
-$SLURM_NTASKS requests the
--ntasksvalue (an integer stored in the shell variable$SLURM_NTASKS) to the solver, so for the above example--ntask, this flag will become-t40.-mpi=intelThis would be required if you have more than one node or-ntasks>1, and implies it will be using the Intel MPI implementation.-pinfiniband Required with -mpi=intel. Implies that Fluent will use the Infiniband interconnect.
-cnf is the node list and can be used as it is.
-gu This is the batch mode flag, which means a GUI will “not” open when you ask Fluent to open. Removing this flag will open Fluent GUI.
-i Input a journal file with .jou extension.
journal_run.jou The journal file that will perform the steps mentioned in it inside fluent.
out.txt This outputs the print statements of the fluent console to a text file, which can be tracked in real-time with
tail -f out.txtcommand once your submission has been made.